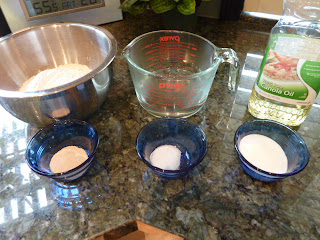
I love this recipe because it only uses 6 ingredients- water, bread flour, oil, sugar, salt, and yeast. Nothing fancy here and I believe if you're out of one item you can replace it with another (brown sugar for white, olive oil for vegetable oil etc) but I haven't tried that yet.
For the Zojirushi here are the ingredients in order:
1 cup warm water
2 tablespoons vegetable oil
3 cups bread flour
1/3 cup white sugar
3/4 teaspoon salt
2 1/4 teaspoons active dry yeast
I find it easier to gather all the ingredients together and measure them out. Then I just dump them into the pan in order. With the Zoji always start with liquids first- so in this case put the water and oil in the pan first (take the pan out of the bread machine when loading it. That'll help keep the heating elements clean and flour free). Then put your flour on top of the water and oil- you don't need to mix them. Just let the flour sit on the water. I put the sugar on one side, the salt on the other, and then make a little dimple in the center to place the yeast. Keep the yeast from touching and liquids.
Ok, now just plop this little bread baby in your Zoji. Today was cold and I left all the settings alone- basic, white, and light crust with the preheat option. After preheating and during the first kneading, I opened up the lid to check it out:
To me it looked a little sticky, but I just left it as is. I did scrape the sides down to help mix it. I read that in the first 5 min of kneading you can tell how your dough will turn out. I haven't mastered this yet. Here the dough looks sticky but later it's pretty smooth.
Since this Zoji is made for 2lb loaves, the dough tends to favor one side of the pan when you're making a smaller batch. I like to check in on it when it's rising to move the dough towards the center of the pan to make a more even loaf. A little while later the dough split into two on the paddles:
And finally:
I like to take the bread out as soon as it's done baking.
For the Zojirushi here are the ingredients in order:
1 cup warm water
2 tablespoons vegetable oil
3 cups bread flour
1/3 cup white sugar
3/4 teaspoon salt
2 1/4 teaspoons active dry yeast
I find it easier to gather all the ingredients together and measure them out. Then I just dump them into the pan in order. With the Zoji always start with liquids first- so in this case put the water and oil in the pan first (take the pan out of the bread machine when loading it. That'll help keep the heating elements clean and flour free). Then put your flour on top of the water and oil- you don't need to mix them. Just let the flour sit on the water. I put the sugar on one side, the salt on the other, and then make a little dimple in the center to place the yeast. Keep the yeast from touching and liquids.
Ok, now just plop this little bread baby in your Zoji. Today was cold and I left all the settings alone- basic, white, and light crust with the preheat option. After preheating and during the first kneading, I opened up the lid to check it out:
To me it looked a little sticky, but I just left it as is. I did scrape the sides down to help mix it. I read that in the first 5 min of kneading you can tell how your dough will turn out. I haven't mastered this yet. Here the dough looks sticky but later it's pretty smooth.
Since this Zoji is made for 2lb loaves, the dough tends to favor one side of the pan when you're making a smaller batch. I like to check in on it when it's rising to move the dough towards the center of the pan to make a more even loaf. A little while later the dough split into two on the paddles:
And then it morphed into one little dough ball at the end of the first knead:
When the dough is on the "rise" part, I moved the dough ball to the center of the pan:
I've made loaves that turned out slanted and pretty uneven. I figure it's because the dough isn't rising evenly here during the first and second rise. I always try to check on the dough during these times to move it around and shape it into a more even loaf. I use a soft plastic spatula so I don't scratch the pan. Here is dough rising, nicely centered:
I like to take the bread out as soon as it's done baking.
This was the first time I didn't lose a paddle in the bread. If you do find that there's a paddle embedded in your loaf, just leave it there until the bread cools completely. Your bread might dry out if you poke at it (or cut it and start munching on it) before it cools. Hard to do, I know but it'll keep a little better if you wait.
Yay! Enjoy your fresh bread!


No comments:
Post a Comment